Arduino Home : www.sharetechnote.com
Arduino - Expanding Pins
When you are at the basic learning phase of Arduino and build a system which is made up of only one or two devices, you wouldn't have much problems with the number of pins on Arduino board. However as your project (a system you want to build with Arduino) gets a little bit complicated, you will soon find that the number of pins on the board is not enough. Based on my experience, I was running out of pins in the following order. You may have different experience from mine depending on the type of system you have made, but whatever you have done, the common experience would be you would run out of pins soon.
Followings are my list. Top one is the pins that I ran out of, most quickly.
i) Ground and Vcc (3V, 5V) pins
ii) Digital output pins
iii) Analog input pins
v) Analog output pins
vi) Digital Input pins
Different people would have different solutions for each of these cases. I like to use such a solution that would minimize soldering (I don't like soldering and I am not good at it either). Followings are several ways to handle this kind of situation.
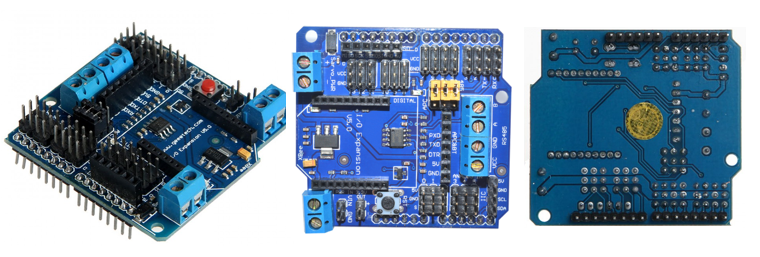
As I mentioned above, you would run out of 3.3V, 5V, GND pins at the earliest since there is only one 3.3V, one 5V and three GND pin in case of Arduino Uno. One of the most common workaround for this case would be to use breadboard and connect Arduino Voltage output and GND pins to the breadboard. However I don't like much of this method since I don't like to carry the bulky breadboard with Arduino board. Another way would be to use I/O expansion shield as shown below (You can find many different types of I/O shield). Most of these shield provide the same number of Analog, Digital I/O pins and provide a lot of additional GND, Vcc (V out) pins. Also depending on the shield, they would provide some additional pins which is not provided by the Arduino board itself (e.g, Servo out pins).
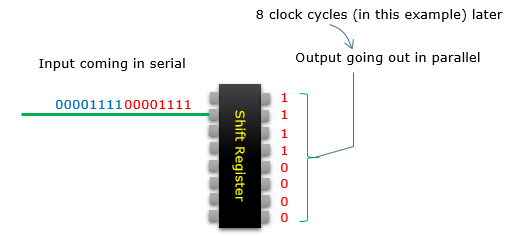
Increasing(Expanding) the number of digital pins would be a little bit tricky. One of the most common trick would be to use Shift Register. If you are interested in what is Shift Register and how it works, refer to Sift Register page in Electronics menu. But simply put, we can increase the number of digital out pins by converting the serial data into a parallel data.
Just looking at data out pins, you can convert a serial data into a multiple parallel output (This example shows a 8 bit shift register meaning 8 bit data coming in serial is converted to 8 bit parallel data as illustrated below).
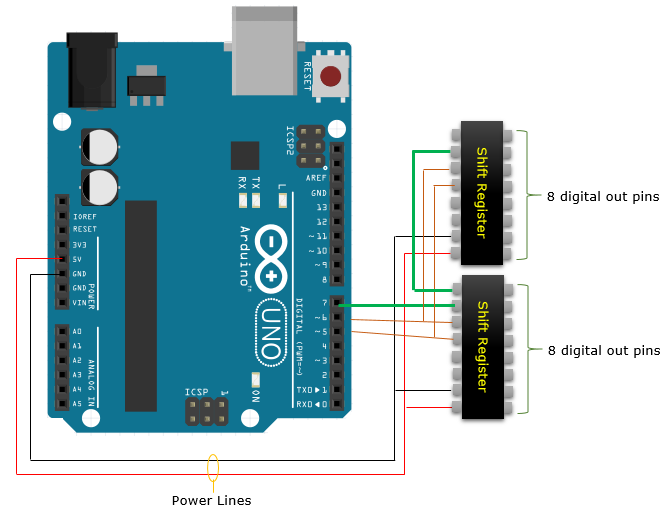
If you connect multiple shift registers in series, you can convert one data pin into even more numbers of data pins as shown below. Theoretically you can convert one serial pin into any number of pins by connecting many shieft registers.

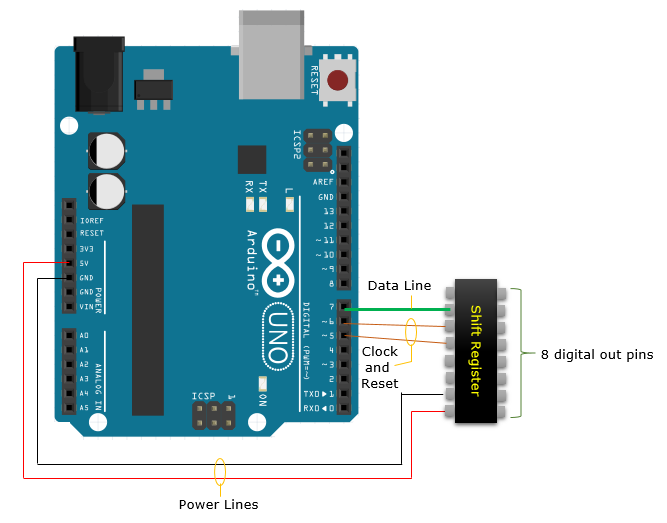
According to the conceptual illustration as shown above, you may think you may expand one digital IO pins to 8 digital IO pins (in case of using 8 bit shift register). However, to operate the shift register you would need several other pins to provide power to the shieft register chip and control the chip as shown below (Don't care much of the exact pin connection since they would vary depending on the shift register chipset). In this case, you may say you have some gain in terms of number of pins because you use 3 digital out pins and get 8 digital out pins.
By connecting two shift registers as shown below, you would get even higher gain in terms of number of pins. In this example, you still use only 3 digital out pins and get 18 digital out pins
Reference