A throughput test needs a traffic source at one end of the data path and a traffic sink at the other end. This page covers two tools for that job. The iperf tool generates UDP or TCP traffic at a rate you choose, so it is the tool for pushing the link to its limit. FileZilla moves real files over FTP, so it shows what a TCP application gets in practice. Both tools need some settings before they can fill an LTE link, and each section below lists those settings.
iperf - UDP/TCP Flooding
Iperf would be one of the most common tools for data throughput test because of easy installation, easy operation, less overhead. It sends a stream of UDP or TCP packets between two hosts and reports the rate. So it measures the IP path itself, with no file system or application logic in the way.
You can download iperf from http://sourceforge.net/projects/iperf/
I think you can get pretty good tutorial from http://openmaniak.com/iperf.php
Tips :
i) When you do UDP test, don't push too high data comparing to the expected data rate.
ii) When you do TCP test, set window size (-w option value) very carefully. (There is no clear/direct way to figure out the optimum value. You would need some try and error).
Examples :
Let's look into an example to get familiar with the usage of iperf. The example assumes a test setup as illustrated below.
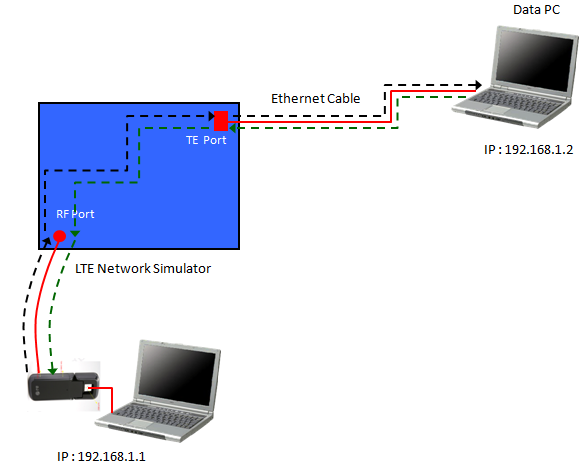
In the diagram above, the UE side is a data card on a PC with the IP address 192.168.1.1. The Data PC on the TE Port of the LTE Network Simulator has the IP address 192.168.1.2. So a sender command with -c 192.168.1.1 sends traffic toward the UE, which is a downlink test, and it runs on the Data PC. For an uplink test, swap the roles. Run the receiver command on the Data PC, and run the sender command on the UE PC with -c 192.168.1.2.
Following is examples iperf command for the test. You need to run 'Reciever' side command first and then execute the 'Sender' side command.
|
Protocol |
Reciever |
Sender |
Memo |
|
UDP |
iperf -s -u |
iperf -u -c 192.168.1.1 |
|
iperf -s -u |
iperf -u -c 192.168.1.1 -b 100Mb |
-b specifies the data rate |
|
iperf -s -u -w 512K |
iperf -u -c 192.168.1.1 -b 100Mb -w 512K |
-w specifies window size of iperf |
|
iperf -s -u -w 512K -l 16K |
iperf -u -c 192.168.1.1 -b 100Mb -w 512K -l 16K |
-l specifies packet length of iperf |
|
iperf -s -u -w 512K -l 16K |
iperf -u -c 192.168.1.1 -b 100Mb -w 512K -l 16K -t 60 |
-t specifies execution time |
|
iperf -s -u -w 512K -l 16K |
iperf -u -c 192.168.1.1 -b 100Mb -w 512K -l 16K -t 60 -i1 |
-i specifies stat. display interval |
|
iperf -s -u |
iperf -u -c 192.168.1.1 -b 150Mb -P2 |
-P2 indicates two parallel client threads |
|
|
TCP |
iperf -s |
iperf -c 192.168.1.1 |
|
|
iperf -s -w 512K |
iperf -c 192.168.1.1 -w 512K |
-w specifies window size of iperf |
|
iperf -s -w 512K -l 16K |
iperf -c 192.168.1.1 -w 512K -l 16K |
-l specifies packet length of iperf |
|
iperf -s -w 512K -l 16K |
iperf -c 192.168.1.1 -w 512K -l 16K -t 60 |
-t specifies execution time |
|
iperf -s -w 512K -l 16K |
iperf -c 192.168.1.1 -w 512K -l 16K -t 60 -i1 |
-i specifies stat. display interval |
Note : Run 'Reciever side' first and then run 'Sender' side. (If you don't need to get any iperf feedback from the reciever or it is not possible to do it, just run Sender side).
Note : For example, if you want send the packet from the test equipment to UE, the Sender part is the command you have to run on the test equipment and 192.168.1.1 indicates UE IP address.
Here goes very good resource and tutorial : iperf.fr (Very well summarized)
Read the UDP result on the receiver side. The sender knows only the rate at which it sent. The receiver reports the rate that arrived, together with the number of lost datagrams and the jitter. This is why the first tip says not to push much more than the expected rate. The extra datagrams are dropped in a buffer somewhere along the path, and the loss figure then tells you more about that buffer than about the radio link.
The -l 16K rows need a warning for UDP. A datagram of 16 KB does not fit in one Ethernet frame, so the IP layer splits it into about a dozen fragments. If one fragment is lost, the receiver discards the whole datagram. So for a UDP test over LTE, keep the datagram below the MTU, for example at the iperf 2 default of 1470 bytes.
For TCP, the -w value must cover the bandwidth delay product. That is the amount of data in flight during one round trip. At 100 Mbps and a round trip of 20 ms, the link holds 100 Mbps x 0.02 s = 2 Mbit, which is 250 KB. A window of 256 KB or more is needed to keep that link full, and the 512K in the table covers it with margin. Use the ping delay from the Check Before Test page as the round trip.
One more point on versions. The iperf.fr site also distributes iperf3, and iperf3 does not work with iperf 2. So both ends must run the same major version. In iperf3, the server runs iperf3 -s for both UDP and TCP, and only the client adds -u.
Run the receiver first : the sender has nothing to connect to until the receiver listens.Judge UDP by the receiver report : only the receiver sees the arrival rate and the lost datagrams.Keep UDP datagrams below the MTU : a fragmented datagram is lost when any one of its fragments is lost.Size the TCP window from the round trip : the window must hold at least the data rate multiplied by the round trip time.
Filezilla - FTP
FileZilla is an FTP client and server pair. Unlike iperf, it moves real files over TCP, so the result shows what a file transfer application gets from the link. Both the server and the client are free to download.
You can download FileZilla Client and Server from following sites.
- Filezilla Server Download from http://filezilla-project.org/download.php?type=server
- Filezilla Client Download from http://filezilla-project.org/download.php
For general setup, refer to tutorials you can search from various source.
For very high data rate application (e.g, LTE throughput test), downloading only one file would not push the enough data rate. A workaround for this case is to download multiple files simultaneously. For this kind of multiple download, you have to configure FileZilla server and Client to enable multiple download/upload. You can set this configuration as shown below.
FileZilla Server Side Configuration
The server side needs four settings. The account and the shared folder let the UE log in and see the files. The buffer sizes and the number of threads decide how fast the server can push those files. The four numbered steps below follow the FileZilla Server menus in that order.
1. Account Creation
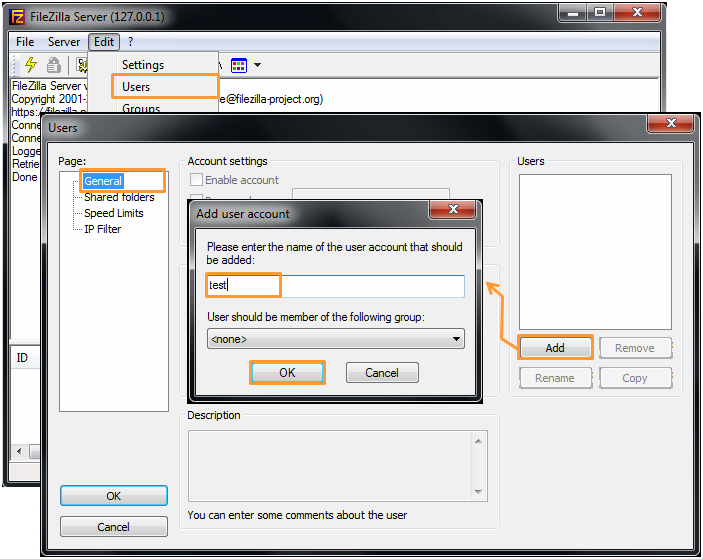
In the screenshot above, Edit and then Users opens the Users dialog. On the General page, Add opens the Add user account box. The example enters the user name test and leaves the group at none.
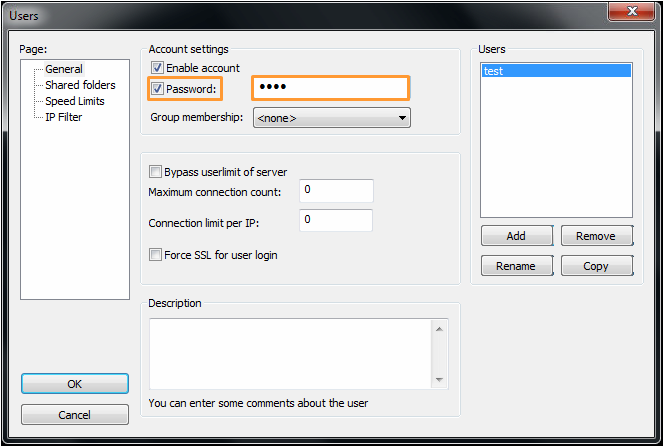
After OK, the account test appears in the Users list. Enable account is checked, and Password is checked with a password entered. The UE uses this user name and password when its FTP client logs in.
2. Server-side Folder Setup
You need to create a folder where you put the files that will be downloaded by UE and configure the folder in FileZilla configuration.
First create a folder and put any files in the folder as shown below. You can name the folder in anyway you like. In this example, I put only one file but I would suggest you to put multiple files in the folder because there will be cases where you would need to download multiple files simulteneously.
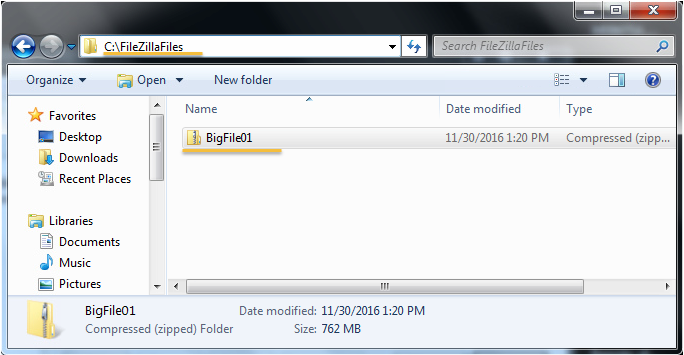
The example folder is C:\FileZillaFiles, and it holds one file, BigFile01, which is a compressed folder of 762 MB. A large file keeps each transfer running long enough to read a stable rate.
Set the folder created above in FileZilla Server as shown below.
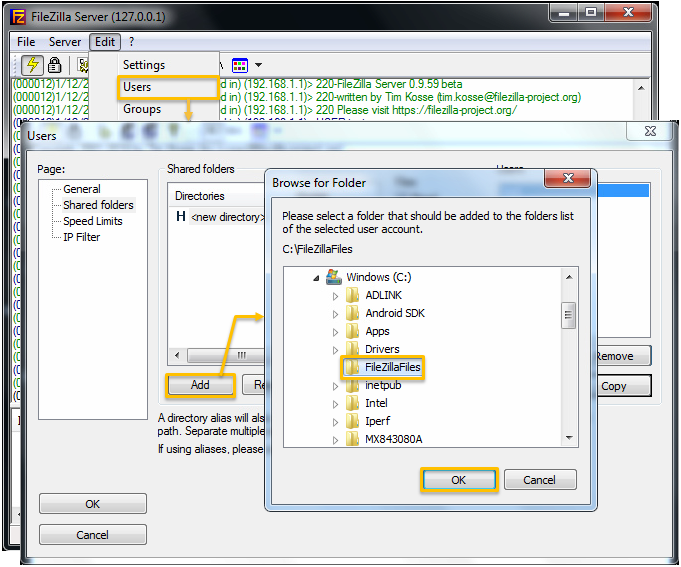
In the screenshot above, Edit, Users, Shared folders and Add open the Browse for Folder box, and the example selects FileZillaFiles on drive C. The H in front of the directory in the Directories list marks it as the home directory of the user.
3. Buffer Setting
Sometimes you may not see the max throughput if the requirement is very high (like over 100 Mbps). In this case, the first items I recommend to check is buffer settings as shown below.
One example for the value that I am using for high throughput is : (You may need more tweaking for your own specific settings)
- Internal Transfer Buffer Size = 524288
- Socket Buffer Size = 65536000
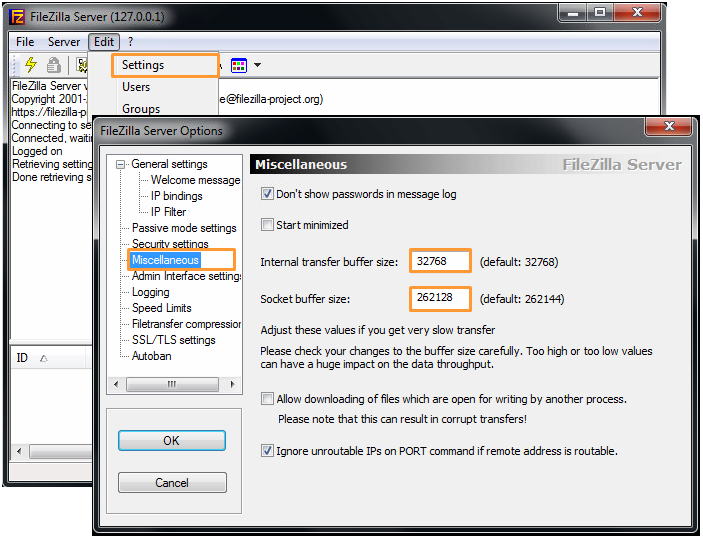
In the screenshot above, Edit, Settings and Miscellaneous show the two buffer fields. The screenshot shows an Internal transfer buffer size of 32768, which is the default, and a Socket buffer size of 262128, next to a default of 262144. These are not the values in the list above, so type the listed values into the two fields. The dialog itself warns that too high or too low values can have a huge impact on the data throughput.
4. Number of Thread Setting
However you tweak the buffer settings, sometimes you may not achieve the maximum throughput with one or two files. In that case, you may need to download or upload multiple files simultaneously. In that case, you may need to increase the number of thread as shown below.
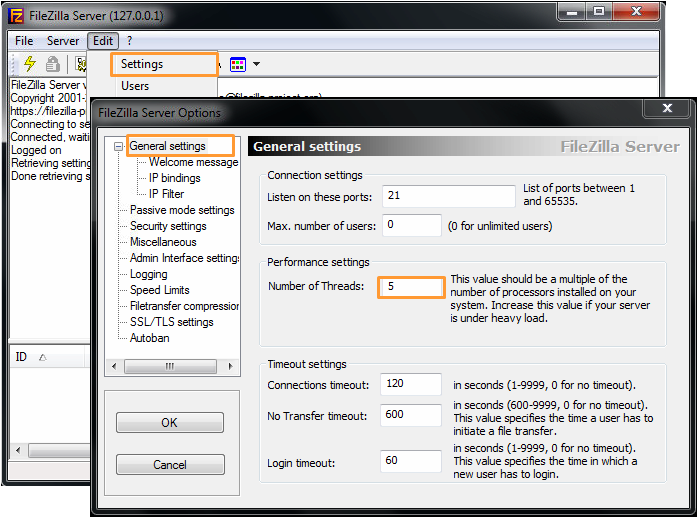
In the screenshot above, Edit, Settings and General settings show the Performance settings, where Number of Threads is 5. The note next to the field says that the value should be a multiple of the number of processors. It also says to increase the value if the server is under heavy load.
FileZilla Client Side Configuration
The client side needs two settings. One lets the client run several transfers at the same time, so that a single file does not limit the rate. The other sets the FTP transfer mode, which decides who opens the data connection.
1. Number of Simultaneous Transfer
In relatively low throughput, it would be enough to download/upload only one file at a time to achieve the max throughput. But in a very high throughput configuration (e.g, over 100 Mbps), single file transfer at a time may not be enough to achieve max throughput. In this case, you may try transmitting/recieving multiple files simultaneously. To do this, you need the increase the "Maximum Simultaneous transfer" as shown below.
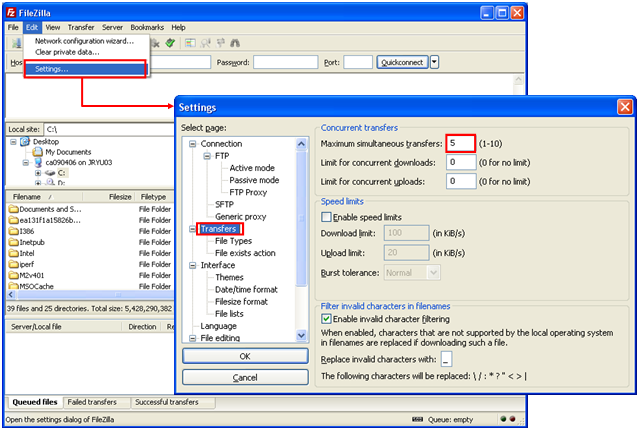
In the FileZilla client, Edit, Settings and Transfers show Maximum simultaneous transfers, which accepts 1 to 10. The example sets it to 5. The limits for concurrent downloads and uploads stay at 0, which means no limit.
2. Transfer Mode
In most case, FTP client try to download/upload files in Active mode, but some UE or some server allows only Passive mode. In that case, you would need to set the proper transfer mode as shown below.
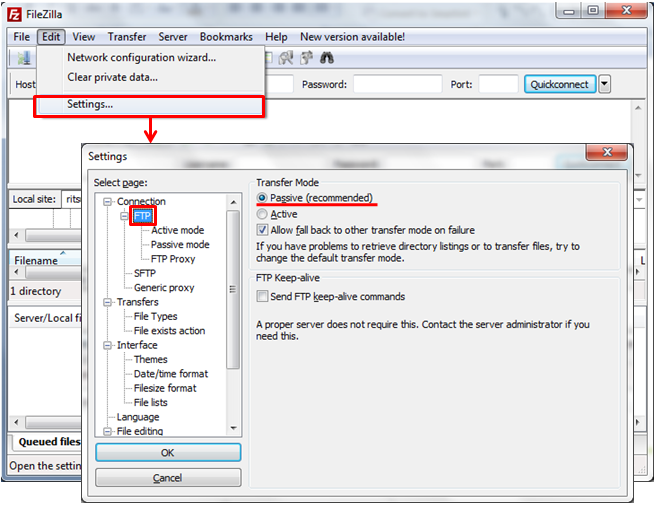
In the screenshot above, Edit, Settings, Connection and FTP show the Transfer Mode. In this client version, Passive is selected and marked as recommended, and Allow fall back to other transfer mode on failure is checked. So a recent FileZilla client already starts in Passive mode. The setting matters more for older clients and for other FTP tools, which may start in Active mode.
The difference between the two modes is the direction of the data connection. In Active mode, the server opens the data connection back toward the client. A NAT or a firewall on the UE side usually blocks that connection. In Passive mode, the client opens both the control connection and the data connection. So the data connection passes the same NAT as the control connection.
Several files at once fill the link : one FTP transfer often cannot reach a rate above 100 Mbps by itself.Set the buffers on purpose : the values in the screenshot are near the defaults, not the values listed for high throughput.Match threads to the CPU : FileZilla Server asks for a multiple of the number of processors.Use Passive mode behind a NAT : the client opens the data connection, so the NAT on the UE side lets it through.